You have a great product. You built a beautiful Shopify store. You launched your ads.
And… nobody is buying.
The problem likely isn’t your product; it’s your photos.
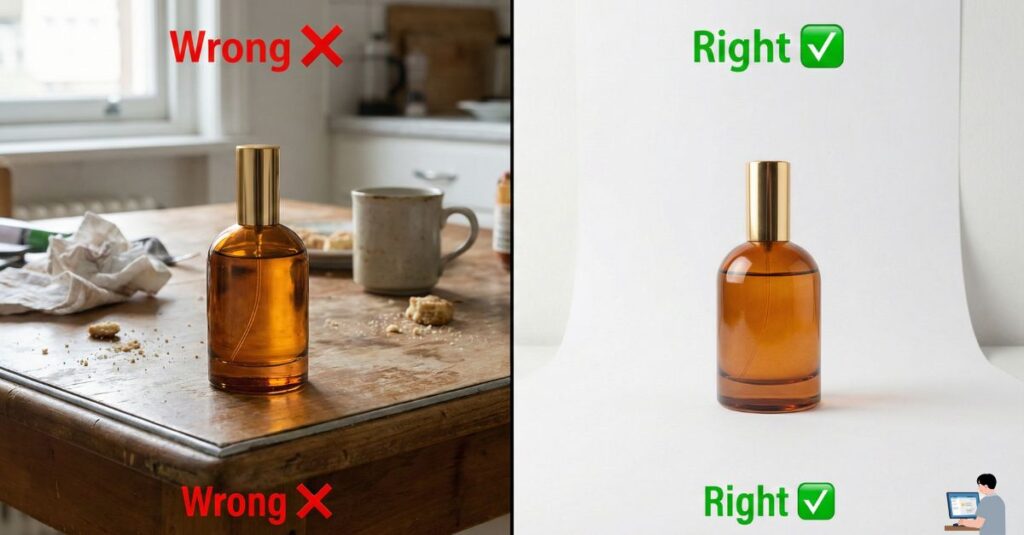
In e-commerce, customers can’t touch the product, so they judge quality entirely by the image. If your photo looks like it was taken on a messy kitchen table with bad lighting, they assume your product is low quality.
In the past, fixing this meant hiring a professional photographer, renting a studio, and buying expensive lights. It cost $5,000 and took weeks.
Welcome to 2026. You can now use your smartphone (whether it’s an iPhone 16 or a budget Android) and AI tools to create “Vogue-Level” product shots in under 5 minutes.
In this guide, I will show you the exact “No-Studio” workflow to turn a boring phone photo into a luxury ad creative using AI.
Table of Contents
The Secret: The “Hybrid” Method
Most people fail at AI photography because they rely too much on the AI. They upload a dark, blurry photo to an AI generator and expect a miracle.
Garbage In = Garbage Out.
To get a result that truly replaces a professional studio, you need the Hybrid Method:
- 10% Human: You must take a sharp, well-lit source photo.
- 90% AI: The AI handles the background, shadows, and reflections.
Step 1: The Setup (The White Paper Hack)
You don’t need a DSLR. You just need soft light. Whether you are shooting in New York or doing product photography in United kingdom, the sun is free everywhere.
- Find a Window: Go to the brightest window in your house, but avoid direct sunlight (which creates harsh, ugly shadows). You want diffused light.
- The “White Paper” Hack: Place a plain white sheet of paper on a table. Curve it up against a wall or box to create an “Infinity Curve” (a seamless background).
- Snap the Photo: Place your product in the center. Wipe your phone lens. Take the photo at eye level (not from high above).
Step 2: Choose Your AI Studio (The Top 3)
There are three main contenders in 2026 for AI product photography.
| Tool | Best For | Why? |
| Photoroom | Mobile / Social | It’s an app on your phone. Fastest way to remove backgrounds and add “Instant Backgrounds” (e.g., Marble, Podium). |
| Pebblely | Realism | Famous for Lighting Match. If you put a bottle on a beach, it adds the correct sun reflection on the glass. |
| Claid.ai | High-Res Ads | Best for upscaling. It ensures your photo is crisp enough for 4K monitors or print. |
Step 3: The “Context” Prompt (Writing the Script)
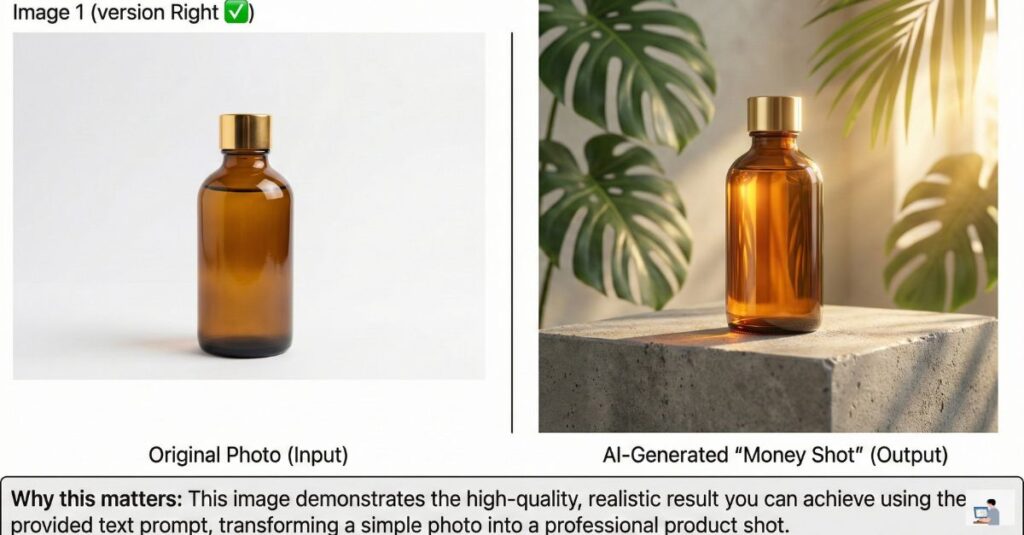
Now, upload your photo to the tool (like Pebblely). Don’t just click “Generate.” You need to describe the scene to get a pro look.
The Formula: [Surface] + [Lighting] + [Vibe]
Copy This Prompt:
“Product sitting on a rough concrete podium, surrounded by green tropical leaves. Soft morning sunlight coming from the right side. Cinematic shadows, high definition, luxury spa vibe.”
Why this works: Adding words like “Shadows” and “Sunlight” tells the AI to blend the object into the scene, removing that fake “sticker” look.
Pro Tip: The “Hand Model” Hack
One of the hardest shots to get is a “Lifestyle” shot (someone holding your product). Hiring a hand model is expensive.
The Hack:
- Take a photo of your own hand holding the product. (Don’t worry if your hand looks unpolished or you have no manicure).
- Upload it to Photoroom or Canva Magic Edit.
- Use the “AI Replace” brush to paint over your hand (keeping the product visible).
- Prompt: “Professional hand model with manicured nails.”
The AI will replace your hand with a perfect model’s hand while keeping the product exactly the same. It is magic.
⚠️ Important: The “Refund Risk” (Ethics)
AI is powerful, but dangerous.
The Rule: You can change the background, but never change the product.
- Do not use AI to smooth out wrinkles on a shirt that is actually wrinkly.
- Do not use AI to fix scratches or dents on a used item.
If the photo looks better than reality, customers will buy it, receive the item, feel cheated, and demand a refund. Use AI for Atmosphere, not Deception.
Video Insight: Photoroom Workflow
Want to see how fast this is? Watch this tutorial on using Photoroom to take a photo of a sneaker and turn it into a professional ad in seconds.
(Video Title: How to Create Professional Product Photos with Your Phone – Photoroom Tutorial)
FAQ: Real User Queries Answered
Q: Is AI product photography free?
A: Most tools (Photoroom, Pixelcut) have a Free Tier that lets you generate basic images with a watermark. To remove the watermark and get high-res downloads, you usually pay ~$10-15/month. Compared to a $5,000 studio, it is a steal.
Q: Can I use AI models for fashion?
A: Yes. Tools like Botika or Lalaland.ai allow you to upload a photo of clothing on a mannequin, and the AI will swap the mannequin for a realistic human model (diverse ages, ethnicities, and sizes).
Q: What if I don’t have a window?
A: Use your computer monitor! Pull up a “White Screen” video on YouTube, turn the brightness to 100%, and place your product in front of it. It acts as a perfect “Soft Box” light.
Final Verdict: Speed Wins
In e-commerce, you need to test products fast. You can’t wait 2 weeks for a photographer.
With this AI workflow, you can launch a new product at 9:00 AM, take the photo at 9:05 AM, and have a professional ad running by 9:30 AM.
Tools to Try Today:
- Photoroom (App Store / Play Store)
- Pebblely.com (Desktop Web)
- Claid.ai (For Upscaling)